


If you’re like most people, you use your camera to capture some of the most precious moments of your life. This can result in a mass accumulation of photographs when you add your own shots to the old photos you’ve collected over the years from friends and family.
The real trouble is that printed photos not only take up a lot of space, but they are also prone to damage due to age, the environment, or both. Humidity and heat can both be very damaging to your photo collection. What’s more, once you lose your printed original photo and you don’t have a copy, it is gone forever. So, if there’s a fire, a flood, or your old family photos get lost in a move - or any number of other things – you could lose them and have no way to get them back.
Converting your photos to a digital format is the best way to preserve them, but when you have hundreds or thousands of photos, scanning all of them is time-consuming and a big deal. Digitizing allows you to preserve those precious memories, keep them more secure, and make them more shareable on social media and email.
Here are 3 ways to scan a lot of photos in bulk and DIY digitizing tips to make your photos look fantastic!
1. Use a Bulk Photo Scanning Service
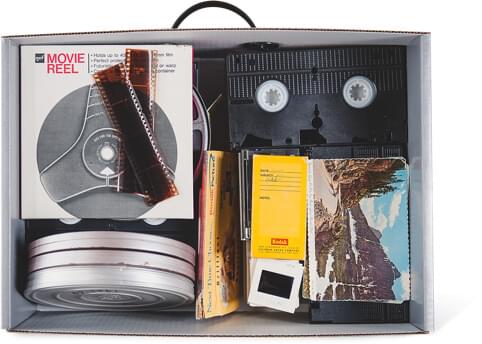
Scanning tons of photos at home is a big commitment. Sending them to a photo scanning service like Legacybox will save you time and ensure that they are digitized at the highest quality possible. Plus, the professionals who offer these services will make sure that your old photos are handled with the utmost care during every step of the process and retain their image quality. Hands down, this is the best way to scan many photos at once.
In fact, Legacybox offers bulk photo scanning services, perfect for large stacks of old photos.

2. Use A Scanner
If you have a good home photo scanner, you probably already have the technology and scanning software to scan your photos yourself. It’s also the quickest way to scan photos if you don’t have more than, say, a shoebox full and you need them quickly. However, there are some things that you will need to keep in mind in regard to the type of scanner you use:
- A top load feed scanner is the most efficient way to digitize a lot of photos because you can work quickly without taking time to stop and change out the photos like you would with a flatbed scanner. It is just a continuous feed.
- If you are using a flatbed scanner, lay as many photos as possible on the scanner bed and scan them in batches. Just make sure that you leave a little space between them and keep them all aligned the same way for easier editing. Before you begin scanning, wipe the screen down well with a lint-free cloth.
DPI is also very important in scanning. Dots per inch, or DPI, is how the resolution of a digital scan is measured. High dot density equals high resolution of the scanned digital image. 300 DPI is the standard for scanning documents, but a higher resolution is recommended for photos – at least 600 DPI up to around 1200 DPI. Beyond 1200 DPI you could increase the size of the file but likely not increase the level of detail.
Using a professional scanner like the Epson Perfection, Epson Fastfoto, Epson Fastfoto FF, or Canon Canoscan professional photo scanners are ideal, but can be costly - especially if this is a one-time project. However, your scanned images are much more likely to be high-quality.
3. Use a Smartphone
You can digitize your family photos using your smartphone. Both the iPhone iOS and Android phone cameras work well with the right apps, lighting, and accessories. There are several photo scanning apps out there that can help such as Photomyne, Google Photoscan, and Microsoft Lens.
When using this method, you have to be extremely careful about ensuring your phone is clean and it doesn’t have any dirt or debris on the lens. You should also use a tripod or stand for your phone to keep the scan steady and do it in a well-lit area with no shadows on the photos.
While using a smartphone can be the quickest method if you have a small number of photos, it’s important to know that there are a lot of things that can go wrong with this method. A speck of lint on your lens can mar your photos and you might not even realize it until later, after you’ve scanned hundreds of pics.
If you have a high-resolution digital camera you may be able to scan your photos that way and you can load them onto a media card and then upload those digital files to an external hard drive or to the cloud if your camera has wifi capabilities.
DIY Tips
Before you get started, there are a few things to consider so you can ensure that your DIY photo scanning goes well.
Have Tons of Memory Space on Your Device Before You Begin Digitizing
Images take up a lot of space on computers and phones. A higher resolution tends to make them large. This may not correspond to the actual pixel size of the photos that dictates how big or little they appear, but the “heaviness” of the photos because of a higher DPI that compresses more dots within an inch.
Bottom line, make sure you have a lot of space on your device or media card before you start.
If you aren’t familiar with image size, format, and resolution it’s a good idea to do a little research. These things are extremely important and if you don’t get it right you can waste a lot of time on digitized photos that don’t turn out the way you want. If you don’t have the time or don’t want to take the time to do the research, then your best bet is to go with a professional digitizing service.
As for the format, JPEG is probably fine, but PNG and TIFF are also good options depending on what you intend to do with the images.
- JPEG – is a good, general image format that is suitable for online sharing and posting on websites. It is also supported by most sites and applications.
- TIFF – is often preferred for images that are commercially or professionally printed or published.
- PNG – is recommended for images that require transparency.
Keep in mind that the larger the size and resolution, the more storage space it will take up on your computer or phone. You can purchase a large external hard drive or upload your images to the cloud as well and that can offer you more space at a better price.
Backup Your Photos
Leaving your photos solely on your device is not recommended. Things can happen that can cause you to lose your images. Your Mac or PC can crash, it can get damaged, or it can get stolen. You don’t want to lose your memories so make sure you backup your photos. There are a few ways you can do this:
- An external hard drive can work but you have to be careful because it can be damaged or lost.
- Backing up your photos to the cloud is probably the best way to ensure that they won’t be lost and you don’t have to worry about the device being lost, damaged, or stolen.
Leave the Photo Editing to the Pros (if you aren’t a pro yourself)
If you have to do any photo editing, leave it to the professionals if you aren’t absolutely confident in your editing skills. With a good tutorial, you can use photo editing software like PhotoShop to can help with minor editing like cropping, color correction, and contrast.
If you want to digitally remove things from the photo or you need to do repairs for torn or damaged photos, professional editing is highly recommended. Those tasks require a much higher skillset and are not typically appropriate for DIY editing.
When You’re Ready to Turn Your Photo Albums into Digitized Images, Legacybox is Here
Legacybox is the best way to scan multiple photos as it is easy, high-quality, and offers an exceptional customer experience. We digitize old photos, tapes, and film for thousands of satisfied customers every day. Bulk scanning photos on your own is a big undertaking so send them to Legacybox and let the pros do it for you.
Learn more about our bulk photo scanning options, and feel free to reach out if you have any questions.
Looking to organize your current photo collection? Read our tips on organizing 30 years of photos.


